Subscribe For Free Updates!

We'll not spam mate! We promise.

Wednesday, November 27, 2013

Get Facebook's New Timeline Right Now


Facebook CEO Mark Zuckerberg yesterday announced a complete reconceptualization of profile pages on the popular social network with the introduction of Timeline. As Zuckerberg puts it, Timeline is the story of your life.
Gone is the single column wall of posts with the most recent updates telling '15 minutes of your story.' Instead, as the name suggests, you'll see a timeline of life events containing photos and other updates that stretches back to when you joined Facebook. Anyone viewing it can click back to any year where there are updates and see what was going on.
Facebook automatically selects the most important updates and highlights them with a blue dot. Grey dots represent hidden updates that might not be as important. Users can arrange their Timeline however they see fit by removing certain updates or highlighting others that might be important to them. The feature will begin rolling out to the public over the next few weeks, but developers can sign up for early access now. Here's how you can get it too:
  1. Visit the Facebook Developer page and enable it for your account.
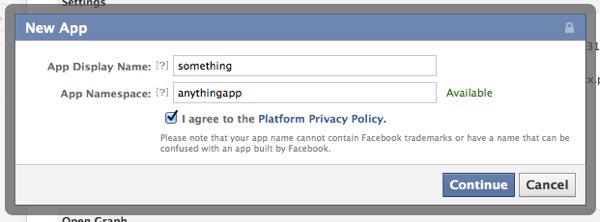
  2. Click the 'Create New App' button on the top right. On the New App prompt window, give your app a display name and name space -- any name, it doesn't matter. Agree to the Platform Privacy Policy and click Continue. You will need a verified Facebook account so make sure you have either a credit card or phone number on file.
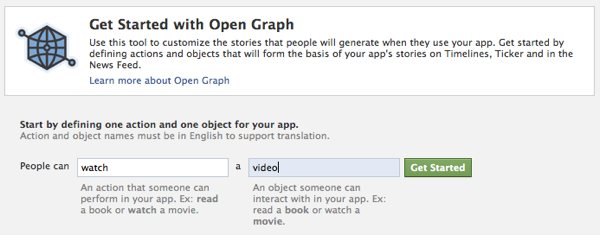
  3. After clearing the CAPTCHA verification you will then be taken to your new apps' settings screen (if Facebook doesn’t put you there automatically hit the Edit App button on the top right). Next, click on Open Graph link in the left column and define an action for your new app on the right pane. You can enter whatever you like; I wrote watch on the first field and chose video from the drop-down menu on the next one. Click "Get Started."
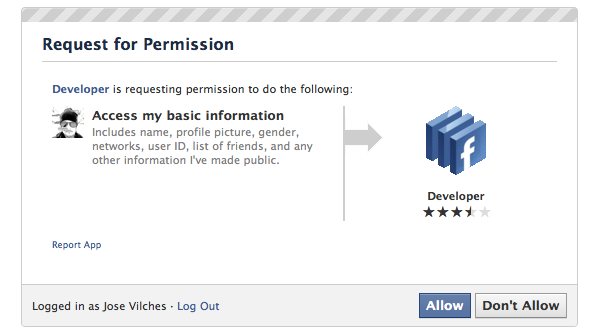
That's it! You may see an error telling you that something went wrong but just ignore that and head to your Facebook homepage, you should see an invitation to the new Facebook Timeline Beta (you may have to wait a few minutes). Once you are in you can take a short tour of the new timeline view or start editing your profile until you are ready to publish it.
The timeline functionality isn't compatible with the "old" Facebook, so most of your friends won't see your fancy new page just yet. Users will be migrated over the coming weeks as Facebook rolls out the update to everyone.
The new Facebook site looks gorgeous, but going beyond pure aesthetics, how do you feel about Facebook's new approach to personal profiles, opening up more about your life to your social circle and potentially to the web?

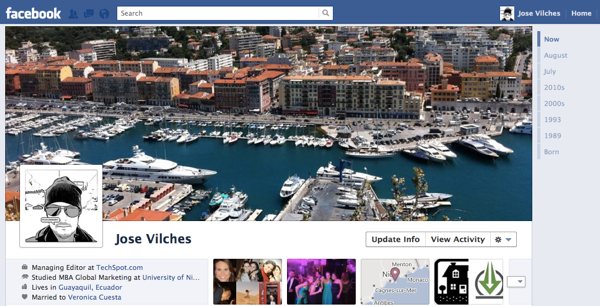
The top portion of the timeline features a configurable background picture called the Cover, 
and has personal information on the left along with your friends, photos, and Likes.


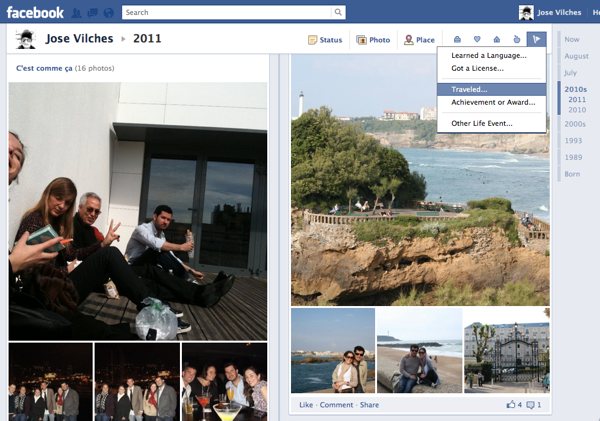
Adding 'life events' to your timeline.

Run Chrome OS From a USB Stick or as a Virtual Machine


Chrome OS notebooks from Acer and Samsung are expected to launch next month at $349 and $429, respectively. The fact that you can get a more powerful netbook with Windows 7 pre-installed for roughly the same price, or even less, is already putting some people off. But that doesn't mean you should disregard Google's operating system without so much as giving it a try -- especially since it's available as a free download for you to test on your own hardware.
Google Chrome OS is to Chromium OS what the Google Chrome browser is to Chromium. It's essentially Chrome OS's open source brother, used primarily by developers, with code that is available for anyone to checkout, modify, and build.
While you'd normally have to build Chromium OS from source to try it out on your computer, several developers have released installable builds that will save you the trouble. Over at chromeos.hexxeh.net, builds are automatically generated each day at around 6PM GMT from the latest Chromium source code, and made available in either bootable USB, VirtualBox or VMWare format. We'll cover both methods in this article while highlighting their pros and cons.
Virtualization Through VirtualBox
Although Hexxeh recommends USB images for the best experience, the easiest way to try out Chromium OS without even rebooting your computer is running it as a virtual machine. More importantly, since Chromium OS will not run on all hardware, this is the way to go if you've got an incompatible machine and just want to give it a quick look.
  1. To get started download and install VirtualBox, then head to this page and get the latest VirtualBox build (for this example we are using version 0.13.526.r8fce2546, built on May 17 2011).
  2. Extract the image file using an application like 7-Zip or WinRAR, so you get a .vdi file.
  3. Open VirtualBox and create a new virtual machine using any name you like. Under OS Type, select Linux as the operating system and leave Ubuntu as the operating system version.
  4. Next you'll have to set the amount of memory that will be allocated for the virtual machine. For our test we just left it at 512MB, which seemed adequate, but you can ramp it up a little if wanted.
  5. In the next screen choose "use existing hard drive" and click on the explore folder to the right. Select the .vdi file extracted on step 2, then click next through the rest of the screens and you're done. You can start the virtual machine and begin using Chromium OS right away.
 
If you'd rather use VMWare the process should be pretty similar, just make sure to download the appropriate image file.
The disadvantage of running Chromium OS as a virtual machine is that there's no graphical acceleration and it simply won't be as fast as the operating system is designed to be. On the other hand, as mentioned before, it will load on your computer and be usable even if your hardware is not listed as compatible on the Chromium OS website.
If for some reason Chromium OS won't load you can simply download a previous build instead. It's not a common occurrence but Hexxeh's repository keeps an archive of daily builds going back up to a month.
Boot Chrome OS from a USB drive
If you've got the right hardware, you can also run Chromium OS natively on your computer from a USB stick. For the most part, any relatively modern x86-powered laptop or Atom netbook should work, but in some cases you might encounter some compatibility problems with certain components. Here's a list of what's been tested to work so far -- and a separate desktop and laptop list by Hexxeh. The process is even simpler with this method:
  1. Get the latest USB build and use a program like WinRAR or 7-Zip to extract until you get the IMG file.
  2. Insert a blank, 2GB or larger USB thumb drive and launch your preferred disk imaging software.
  3. Hexxeh uses Image Writer for Windows but you can use whatever suits you. Simply launch the program, select the image extracted in the first step, and write it to the USB drive.
  4. Once the image is copied to the drive, close the program and you can then boot from your USB stick.
If you are really committed to Chromium OS you could potentially follow the same process to install it into a partition on your hard drive and dual-boot alongside your main operating system. For now at least I'm happy just test driving Google's operating system without making it a permanent resident on my machine.
 
If all goes well you'll be presented with a very straightforward setup wizard, where you can configure language and network settings, then enter your Google credentials and pick an avatar. That's it! Next thing you'll see is a plain Chrome window, which will be very familiar if you've already been using Google's browser on Windows or any other platform. You can start browsing right away or add applications from the Chrome Web Store to have one-click access to them.
 
Keep in mind that while Chrome OS is based off Chromium OS they are not exactly the same thing. Features like Verified Boot and Easy Recovery are not available in the latter, nor is the built-in PDF reader, although you can still access PDF files through Google Docs. Other than that you'll get a pretty close experience to the real thing, with no programs loading on startup, no need for software updates or virus protection, and everything running on the cloud.

How to Backup your Gmail Account

This past weekend over 150,000 Internet users woke up to find their Gmail inboxes, contacts and chat conversations gone. The issue, according to Google, was caused by a storage software update that introduced an unexpected bug. But while the company has since begun restoring data from tape backups and will likely offer some form of compensation where applicable, the incident served as a reminder that no matter how reliable some cloud-based services are, they are certainly not infallible, and thus it might be prudent to have your own backup ready just in case things go amiss.
There are numerous ways to backup your Gmail data and deciding which way to go will largely depend on the level of effort you want to put into it. You could simply setup Gmail to forward all your mails to another email account and call it a day, for instance. But there are also a handful of other options that offer a bit more flexibility and convenience.
Below, we've listed a few of them, so you can choose whichever best suits your needs.
Use a standalone backup program
Gmail Backup is a simple and easy-to-setup free alternative that does exactly what its name says. Upon installation, just type in your credentials and it will begin downloading all your e-mails, backing them up securely, and allowing you to restore them to your account should the unthinkable happen. The program is free and Windows-only. Their website seems to be down due to the increased load in the past few days, but you candownload Gmail Backup here from our local mirror.
If you're willing to shell out $20, Gmail Keeper will back up Gmail messages or messages from a Google Apps Mail account as a .zip file to a local disk. It supports multiple accounts and even stores labels associated with each message, while those concerned about privacy can encrypt their mail and password protect it.
Third-party Web service
Backupify is a handy tool that automatically performs scheduled backups for a number of popular online services including Google Apps, Facebook, Twitter and others. You won't have to put too much effort into the whole backup process -- just supply the login credentials of the sites you want backed up and Backupify takes care of the rest. Be aware though that you're essentially moving your info from one cloud to another.
The site offers both free and paid accounts with varying limitations, but given the recent Gmail blunder, Backupify is taking the opportunity to entice new users with a coupon code "savegmail" for a year of free backups with one of their premium plans, so there's really no reason for not giving it a shot.
Use a desktop mail client
This is probably the most common approach and should take just a few minutes to set up. Gmail offers access to all your mail through desktop clients such as Apple Mail, Microsoft Outlook, Mozilla Thunderbird, and many others. The latter is free and available on all major operating systems, so if you're doing this for the first time and especially if you're only planning to use it for backups rather than as your primary client, then Thunderbird might be the way to go.
For those unfamiliar with the setup process: After signing into Gmail, click the "gear" in the upper-right corner, choose Mail settings, then load the "Forwarding and POP/IMAP" tab. Enable POP for all mail and set Gmail to keep its copy.
You'll then need to setup your desktop mail client to retrieve your emails. Google offers step-by-step instructionsfor a number of clients and Thunderbird's automatic configuration is usually spot on getting your settings right with just your username and password -- but make sure to use POP instead of IMAP for one-way message transfers.
Messages will be downloaded automatically each time you launch Thunderbird and stored into your profile folder -- which you can back up standalone as well for some added security. It's pretty straightforward, but for those who prefer to use the web-based Gmail interface, remembering to run Thunderbird or whatever desktop email client every once in a while might be more work than they're willing to deal with.

Automatically Start Your Browser in 'Private' Mode

People have been making a lot of noise as of late over privacy on the Internet -- and rightfully so. Never before have our personal identities been so broadly exposed. The average web-goer hops from one social infrastructure to the next, leaving behind a humiliating trail of drunken college photos and revealing quizzes that would flush Ron Jeremy's cheeks.
We covered the state of online privacy in a recent mini-series, outlining particulars about covering your tracks on services like Facebooksearch engines, and even torrents. Adding to those articles, we thought it'd be handy to provide a short tip explaining how you can automatically start today's most popular browsers in private mode. Note that in Firefox 3.6 and Chrome 5 there is more than one way of doing this, so you only need to choose one of the methods listed.
This feature allows you to browse the Internet without storing local data that could be retrieved at a later date, such as your browsing history, temporary Internet files, form data, cookies, and usernames and passwords. Keep in mind that private browsing offers virtually no protection beyond the local level -- for example, the websites you have visited will still be able to view your IP address on the server end and log your activity.
Internet Explorer 8
  • Method 1: Right click your IE shortcut icon > Properties > add -private after the text in the Target box and click OK.
  • Method 2: This isn't really a second method per se, but you can start IE8 with private mode via the Windows 7 jumplist.
Firefox 3.6
  • Method 1: Open Firefox, click Tools > Options > click the History drop-down box and select Use custom settings for history > toggle Automatically start Firefox in a private browsing session and click OK.
  • Method 2: Open Firefox, enter about:config in the address bar > filterbrowser.privatebrowsing.autostart > double click on the entry to make it true and close the tab.
  • Method 3: Right click your Firefox shortcut icon > Properties > add -private after the text in the Target box and click OK.
Chrome 5
  • Method 1: Right click your Chrome shortcut icon > Properties > add -incognito after the text in the Target box and click OK.
  • Method 2: This isn't really a second method per se, but you can start Chrome with incognito mode via the Windows 7 jumplist.
Safari 5
  • There doesn't seem to be any built-in way of accomplishing this on Safari, but we've found various scriptsolutions for OS X users. If you know of a similar workaround for Windows, let's hear it in the comments.
Opera 10.5
  • Right click your Opera shortcut icon > Properties > add -newprivatetab after the text in the Target box and click OK.
Granted, you probably don't want to run your main browser in private mode permanently, but it could be useful to have a secondary browser already configured to run without a trace for those times when you need to go dark. Chances are you have at least two browsers installed on your system anyhow.

Monday, November 25, 2013

Lock your PRIVATE FOLDER


1. Make a folder on the desktop and name it as “folder”
2. Now, open notepad and write ren folder folder.{21EC2020-3AEA-1069-A2DD-08002B30309D} and now (Notepad Menu) File>save as.
3. In the ‘save as’ name it as lock.bat and click save ! (Save it on Desktop)
4. Now, again open notepad again and write ren folder.{21EC2020-3AEA-1069-A2DD-08002B30309D} folder and now (Notepad Menu) File>save as.
5. In the ‘save as’ name it as key.bat and click save ! (Save it on Desktop)
6. Now, double click lock.bat to lock the folder and now if you open your folder, control panel will open up !
7. Now, double click key.bat to open the folder and now if you open your folder, you can access your data inside the folder again !
8. Lock your folder and hide the key.bat somewhere else on your hard disk !
9. Whenever you want to open your folder just paste the key.bat on desktop and open your folder using it ! :)

Chat with Friends through Command Prompt

                    Hello friends Now U Can Chat With Command Prompt Through So Here IS A Trick.....

1) All you need is your friend's IP Address and your Command Prompt.

2) Open Notepad and write this code as it is.....!

@echo off
:A
Cls
echo MESSENGER
set /p n=User:
set /p m=Message:
net send %n% %m%
Pause
Goto A


3) Now save this as "Messenger.Bat".

4) Open Command Prompt.

5) Drag this file (.bat file) over to Command Prompt and press Enter.

6) You would then see something like this:


7) Now, type the IP Address of the computer you want to contact and press enter
You will see something like this:


8) Now all you need to do is type your message and press Enter.
Start Chatting.......!

DONE....ENJOY.~!!

INCREASE SPEED OF HARD DISK

It is common observation that some times our computer slows down due to low performance of hard drive. This problem happens due to the slow performance or poor speed of hard drive. When we say about poor performance, actually we mean, poor speed of reading/writing of hard drive. This problem can be solved by increasing the hard drive speed. Follow these steps to solve your problem.


Click Start menu and select run.
Now type (sysedit.exe) in run and press enter.
System configuration editor will appear.
Here you can see some multiple windows but you will select (system.ini).
This window contains a line (386enh)
Now after this line type (irq14=4096)
Now close this window and save it.
Reboot your computer now.
You will surely feel better performance of your computer.
Enjoy.

-->